Welcome mes amis! 
This is a short tutorial on how to get your character(s) to sit/stand behind a desk.
Yes, you will need to understand spot directing/direction, zooms as well as layers & overlays.
Spot Directing/Direction: Click HERE
Zooms: Click HERE
Overlays: Placing & Animating Overlays
Layers: HOW TO: Move Characters / Overlays to the Layers
Stage Direction: HOW TO: Stage Direction
Script symbols (ex. start vs is): Script Symbols/Commands and What They're Used For
Anyways, here I go:
First, I will show sitting in a background without using an overlay:

If you input this code, it will translate to this:

Note, it is the INT. CLASSROOM DESK - DAY background. Do NOT use the INT. CLASSROOM LA DESK - DAY one which puts them in front of the desk.
Other repetitive stuff
Code for it:
@CHAR spot % X Y
% is the scale/height of the character (sometimes denoted using an S)
X is the x-value (left or right) that the character is placed/walks to.
Y is the y-value (up or down) where they are placed.
*replace % X Y with numerical values
So, in this example, % is 1.280, X is 276 for CHAR1 and 65 for CHAR2 while Y is -63 for both of them.
As you can see both characters are the same height (1.280), they are both on the same floor level (-63) and CHAR1 is positioned on the right side (276) while CHAR2 is positioned on the left side (65). Remember, think of it like a grid, values towards the left side of the screen are lower than values on the right side of the screen. In regards to the Y-value, think of it like a vertical line within a grid, where points are placed. Smaller numbers go near the bottom of the line and bigger numbers at the top.

Now, I will show an example of two characters standing in a background with an overlay (you can position them lower to make it appear like they’re sitting by changing the Y value in % X Y since that controls the floor level they are on & it is vertical line that goes up or down)
Here’s the example:

*If this this is confusing to you, I’d recommend reading the guides I linked above in great detail. They’re very helpful.
Anyways, if you input this code, it will translate to this:

How did I get those three values for my overlay? Well, when you’re testing out and placing your overlay, you need to look at the commands below:
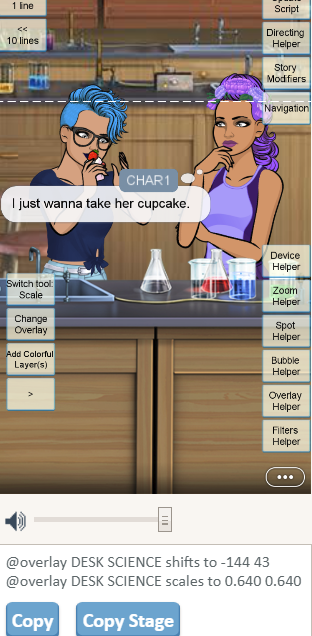
As you can see it gives me:
@overlay DESK SCIENCE shifts to -144 43
@overlay DESK SCIENCE scales to 0.640 0.640
This would translate into your background like this:
INT. EXAMPLE BACKGROUND with DESK SCIENCE to 0.640 -144 43
See where I put the numbers? You’d do it that way
So, I hope this helped and if you have any questions, don’t hesitate to PM me!
Thoughts : )
For my script, I used thought bubbles. If you want a character to think, it would look something like this:
CHAR (animation)
(My thought goes here.)
See how there are () around the statement they’re thinking?
Also, you’d need to replace animation with an actual animation that exists and make them think whatever you want.
An example:
YOU (flirt_wink)
(I love cupcakes too much.)
Leave out the () if you don’t want them to think something and instead want them to say something.
Also, it’s pretty much similar to limelight. Same methods that you use, and perhaps you may end up changing some numbers around to get the desired effect you were looking for.
LIMELIGHT
Sitting behind a desk without an overlay:

This code gives you this visual:

Standing/sitting behind a desk (using an overlay):

And this translates into:

XOXO 
P.S I’d also recommend checking out this guide on so many cool directing tips you can use within your story:
SO, TO END OFF, GOOD LUCK AND REMEMBER THESE ARE EXAMPLES BUT I HOPE THEY HELP YOU! 


